Dead Astronaut FX Chasm Reverb

Remember my Dead Astronaut Chasm Reverb PCB? I finally finished it! I left it quite a long time aside my bench, mainly because I did not have time or money to buy and build all the remaining things that needed to be done. Remember, if you want to have one, you can buy one directly from Dead Astronaut, or buy the PCB to make it yourself.

Here is my build: 
Chasm Reverb Prismatic dead astronaut
I used a prepainted enclosure, with a nice vintage color vibe, close to Surf Green color. With cream knobs of course! I just miss a cream pickguard part to have to most vintage fender look!

As I already said before, it was a fun build to make. The PCB is quite big and components are well spaced, so it is really easy and fun to build it, even for a beginner. I had absolutely no trouble at all. I did a few mistakes with the wiring, which is not a common wiring scheme as the pedal is buffered bypass. Apart from these minor incidents, the pedal almost worked immediatly, nice!
Chasm Reverb Prismatic dead astronaut

There are four potentiometers: volume (to set the output volume), mix (allows you to mix the dry signal with the reverb signal, you can go from a 100% dry to a 100% wet signal), damp (set the overall brightness of the reverb) and decay (set the amount of reverb that goes to into a feedback loop). Indeed, one of the features that make this reverb unique compared to other Belton Bricks reverb out there is that a part of the reverb signal can go through a feedback loop, allowing the reverb to auto oscillate! The switch allows to put the reverb in auto oscillation mode.


How does it sound?

I finally invested in proper recording gear (Senheiser e906 and external audio card), so I manage to record something for you! The Chasm Reverb is a deep, spacy sounding reverb, very good sounding with a delay!

The volume potentiometer is useful if you make it oscillate. At max, it is normal volume level, and you can lower it. The Mix is also quite useful, although I do not really like a too wet sound. The oscillation switch is really killer.

You can make the reverb smoother, and create "waves" of sounds, that lush for a quasi illimited amount of time! It is really awesome when combined with a delay! Perfect for ambiant stuff, and you can leave it on on the background.


Circuit analysis

Here is the circuit, from the build document:
Dead Astronaut Chasm Reverb Schematic
If you have already read the circuit analysis of the Rub A Dub Reverb, you can already find some similarities. As most of the DIY reverbs, it uses a Belton Brick, an IC that allows DIYers to make reverbs without having to use a spring reverb tank.

It is divided in several parts:
Dead Astronaut Chasm Reverb Schematic
Let's analyze each part of the circuit.


Power supply

The power supply is a classic one that we can find in many circuits. It provides 3 different regulated tensions:  9V, 4.5V and a regulated 5V.
Dead Astronaut Chasm Reverb Power Supply
The Zener diode (D6) prevents polarity inversions. R22 and C16 forms a low pass filter that will eliminate any 50Hz parasitic voltage ripples remaining from your AC outlet.

R23 and R24 forms a voltage divider that provides a 4.5V tension (VB). It is regulated by C17, a 47uF capacitor that will absorb excess of voltage. This tension is necessary for the OP amps to operate correctly

Then, there is a voltage regulator, REG1, that is a 7805. "78" means that the output tension is positive, and "05" is the output tension, 5V. The regulator is necessary to supply the Belton brick a good voltage. Unregulated voltage could result in damaging the IC that is very sensitive to higher or lower voltage drops, and so requires a regulated tension provided by this small chip that look like a transistor! You will find this kind of regulators in almost every circuit using numeric IC.


JFET switching buffer

This is a peculiar switching schematic that is very pratical here because it allows the use of a buffered bypass setting that make reverb trails possible. In a true bypass setting, the reverb would be cut abruptly when the effect is turned off, whereas here it can slowly decrease
JFET switching schematic circuit
So how does it work?

First, there is an input buffer, formed with R1, C1, R2 and the first OP amp of a TL072. As you can see, there is no resistor in the loop of the OP amp, thus it has a gain of 1. It is just used to transform the low impedance signal from the guitar into a low impedance signal.

Then, ther is the proper JFET switching. Here, JFET transistors are not used like amplifiers, but rather like "on / off" switches (like in computers!). When the JFET is turned on (by supplying 9V through the DPDT switch), it allows the signal to go from the drain to the source: the signal can pass. When a JFET is on, the other is turned off, so the signal either goes to the effect, or to the buffered output. A diode prevent any parasitic signal from the gate to enter in the signal path.

This switching scheme is nice with a reverb: it diminishes "popping" issues, and allows reverb trails, which is super nice with this reverb and its auto oscillating feature.


The Reverb circuit

The reverb circuit uses the Accutronics reverb module, a great integrated circuit that I presented already in the Rub A Dub Reverb circuit analysis.
Here is a schematic of the BTDR-2H that is used in this circuit:
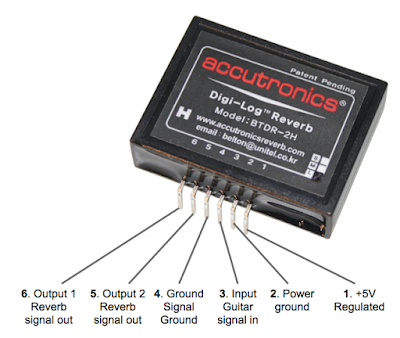
Accutronics BTDR 2H Belton Brick
There are 6 pins on the brick. The two first ones are used for the power supply. Note that the power ground is supposed to be different than the signal ground. In some circuits, that is very important to separate digital and analog ground, and to combine them in only one point in order to diminish noise (especially if you combine digital chips with analog ones like MN3005 that are also in 5V).

The guitar signal enters in the third pin (signal ground on the 4th pin), and is "transformed" by the chip in a reverberated sound that goes out at the 5th and 6th pin. The reverbarated sound is not the dry sound + reverb sound. It is just the reverberated sound, so it is kind of peculiar. You have to mix it with the dry signal to make it sound like a reverb.

Here is the schematic of the reverb:
Dead Astronaut Chasm Reverb schematic

So first, there is a MOSFET input buffer, that increase a bit the signal. The signal is then split in two. A part of it stay dry (Dry signal part), and the other is treated by the Belton brick (reverb signal), they are mixed in the end with a mix potentiometer so you can set the amount of dry signal versus the amount of reverberated signal.

The dry signal just goes through this section without being modified, and goes to the mix knob.

The reverberated signal is buffered by an OP amp (TL072), with a gain of one (so no gain basically). A 100pF capacitors in the loop rolls off a bit of highs, and the signal can enter the BTDR2H brick. The signal then goes out from pin 5 and 6 of the reverb. The high are roll off by a low pass filter formed by the "DAMP" potentiometer and C5. For more infos about low pass filters, read my post about the Big Muff tonestack. Thus, you can set the amount of trebles in the reverbarated sound. Then, the reverbarated sound goes through an OP amp in a similar layout than at the entry. The signal then goes to the mix knob.

If that were the only features of the Chasm Reverb, this reverb would be a simple reverb with a tone control. What makes this reverb unique is its feedback loop. A part of the reverberated signal can go in the feedback loop and goes back to the entry of the reverberation circuit. The amound of signal going back to the begining of the circuit is set by the Decay knob and the switch that let you choose between a 47k resistor (a lot of signal goes back: oscillation) and a 100k one (less signal goes back: more a long-decay like reverb). This is really cool because if you set a high decay, a lot of signal can go back in the reverb circuit, and it can actually autooscillate! It also allows to approximately set the decay of the reverb, which is not possible with a standard BTDR2 brick.

After the dry and reverberated signal are mixed with the "mix" knob, there is another knob, that acts as a master volume knob. It is wired as variable resistor, and acts as a classic volume knob. The signal (reverb + dry) can now goes through the output buffer.


Output buffer

The output buffer is a simple buffer using a single OP amp from a TL072 chip.
Dead Astronaut Chasm Reverb schematic buffer
A 100pF in the loop rolls of a bit of highs. If the pedal is off, the dry signal goes through it with a gain of 1 (resistor R16/R13), but if the pedal is on, it has a bit of gain (R15/R16) to compensate the loss of volume due to the Belton Brick, the mix and volume knobs. It is a simple buffer, very transparent because of the high values of the coupling caps (C10 and C13, 10uF) and the use of the TL072.

There it is! I hope that it is clear and that it was helpful! Do not hesitate to ask questions in the comment. If you like this post, thank me by liking Coda Effects Facebook page!


To go further

JFET switching (pdf by Geofex): great explanations about JFET switching, around the classic Boss / Ibanez circuit.
Accutronics BTDR2 official webpage. 
Pedalrig tips about noise, great infos too!
Chasm Reverb official webpage, if you want to buy a built one or a PCB!

ProCo RAT White Face (1985)

Here is a pedal a customer sent me for repair: a vintage ProCo Rat from 1985! This 30 year old little monster had some troubles with switching, happens that the switch that had been changed made some false contact with the (rusty but still conductive) metallic enclosure. 

It is a classic RAT2, produced in 1985. It is called "White Face" RAT because of the white background of the "RAT" logo. Later versions have a dark background with white lettering.
ProCo RAT white face 1985
The RAT is one of the first distorsions ever made. It was created in the late 70s by Scott Burnham. He was a tech working at ProCo, a super small sized company in Kalamazoo. He was working in his basement, with the rats, hence the name of the pedal!

The RAT has been declined in several versions. The first version, "The Rat", was handmade in Kalamazoo, in a small production manner (like you and me making DIY pedals!). The demand rapidly increased, and the production was switched to an industrial process. "The Rat" was produced from 1979 to 1983. In 1983, the enclosure was changed to a smaller sized one, and the ProCo RAT2 was issued. It is this one!
ProCo RAT white face 1985
It has three controls: distorsion, volume and filter. The filter knob acts as a reverse tone knob. The more you drive it to the right, the less trebles you will have. Input and output are on the top of the pedal (top mounted jacks is the best!). The DC jack input is an old style one, not really useful today where most of the power supplies uses 2,1mm Boss-style jacks.

Since its realease, the RAT pedal has been used extensively by many guitarists. Among the most famous are Kurt Cobain (Nirvana), Jeff Beck, Radiohead et Sonic Youth guitarists or Graham Coxon (Blur). You can see that it has been used a lot in the indie scene. It is an agressive distortion sound, full of harmonics that suits very well grunge music for instance!
ProCo RAT white face 1985
The RAT is still in production, with a red LED in the "RAT" logo. It has been declined in several versions. The original RAT uses standard 1n914 silicon diodes, whereas the turbo RAT uses LED for the clipping. Finally, the "you dirty RAT" latest version of the RAT uses 1n34A germanium diodes... You can use a rotary switch to have all the versions in one pedal!

ProCo RAT white face 1985 
Inside this black box, we can find the classic Motorola LM308 chip, that is now quite difficult to find, and quite expensive too! It is a simple double OP-amp, which provides some of the unique characteristics of the RAT pedal. Today, RAT pedals features a different chip, the OP07DP from Texas Instruments.
ProCo RAT white face LM308N IC
The vintage RAT was reissued with the LM308 chip. In 2010, ProCO even reissued this precise 1985 white face RAT!

Here is a great schematic that sums up all the differences between the different versions of the RAT pedal (click on the image to read it better):
ProCo RAT versions schematic
I hope to release a video soon to show you the sound of this vintage RAT!

To go further
History of RAT pedals (official RAT website)
Scott Burnham interview in 2012 (New York Time magazine)
Circuit analysis by Electrosmash: excellent! Really detailled analysis of the circuit and its variations.
History of RAT pedals: pictures of all the models of the RAT pedal. (here is the RAT2 page)
Manual of the RAT2 (pdf)

Big Muff PCB available!

The Big Muff PCB that I conceived finally arrived in its final version... And it is alive! I also wrote a detailed build document.

Big Muff PCB 

It is a double layer PCB to make your own Big Muff! I added a fourth optional knob: the mids knob. Mids are a huge turn off for me with Big Muff: all your medium frequencies are scooped! 

When you use one in a band, you always disappear in the mix, quite boring when you want to use the loudness and sustain of a Muff and be heard! I made it optional in case you want to stick to the original design. Thus, you can make any Big Muff variant that you want, including "boutique" variants that often use a mids knob!

EHX Big Muff Russian PCB

I made it usable for a 1590B, so quite a small enclosure compared to the original Big Muff, ideal for crowded pedalboard purposes! But you can use it in a bigger enclosure, allowing a lot of mods.

Ready to make your own Big Muff? Get one here:

 Buy


The quality is maximum with this PCB: it has been made using an immersion gold process that ensure easy soldering, and long lasting connexions. The PCB is lead free, so it can be used in any country (Europe does not allows lead in solder or electronic devices). Pads are quite spaced, and are big enough to allow easy soldering.

Big Muff circuit board

I used he same components name than in The Big Muff page. This is very useful, you can just pick the version you like on the Big Muff page, and make it yourself quickly! It also makes mods easier to do, and you can relate quickly between the excellent circuit guide from the Big Muff page to the PCB.

Electro harmonix Big Muff circuit board PCB

Example of a pedal made with the PCB

Here is a Ram's Head I made with the PCB. It is made wit a "replica" spirit: I used the exact same values as a 73' ram's head. I always wanted to know exactly what it sounded like, so this was a good time to try it!

Big Muff Ram's Head DIY

This pedal was made to test the "optionality" of the mid knob, really easy to do. I used my "Dolmen Fuzz" logo, made by HPM laser. I used a standard 1590B Hammond enclosure, that I polished with sand paper like my other Big Muff.

Big Muff Ram's Head DIY

As you can see, it fits perfectly in the enclosure. I tested my drill template, it is perfect! As you can see, I made the wiring easy:

Big Muff Ram's Head DIY

I also tested the compatibility of the PCB with Wima MKP2, which are really good capacitor for audio. Works well and gives a niche red touch to the circuit!

Big Muff Ram's Head DIY circuit

With my PCB and the detailed build doc I have written, you should be able to make your own Big Muff easily!

Ready to build yours? Get one here:

 Buy

Potentiometers and guitar effects

Remember my post about resistors in guitar effects? Let's study another component essential for guitar effects: the potentiometer. It is essential for the main reason that it is one of the two components that allow you to modulate the effect of your guitar pedal, in a continuous manner! Thus, you can choose the final volume of your pedal, the intensity of the effect (gain, mix, delay volume...etc). Lets see what is a potentiometer, how it works, and how it is used in a guitar pedal effects.


The potentiometer: what is it?


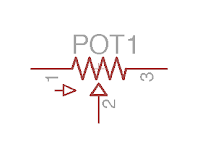
A potentiometer simply is a variable resistor! As resistors, its value is expressed in Ohms. Usually, potentiometers have a value between 1k and 10M. If you turn the potentiometer, its value will change. It has 3 lugs, named A, B and C (or 1, 2 and 3, respectively) that you can see on this picture:
potentiometer a b c 1 2 3
It consists of 2 combined resistors. The value between A and C (lets call it Rac) is constant, and equal to the value of the potentiometer (100k for instance), whereas the value between A and B (Rab) or between B and C (Rbc) can vary between 0 and 100k depending on the rotation of the potentiometer. In fact, it is like dividing a resistor in two:
potentiometer
The value of Rab and Rbc varies depending on the rotation of the potentiometer, but Rab + Rbc is constant, equal to the value of the potentiometer, Rac! The symbol used for a potentiometer is this one:
potentiometer a b c schematic
Inside the potentiometer, there is a resistive track. When you rotate the potentiometer, the length of this resistive track varies between the lugs, and you vary the value of the resistance. Here is a gif that I made to make it easier to understand:
potentiometer how it works
So when you rotate the potentiometer to the right, the resistance between A and B increases. When you rotate it to the left, it diminishes.
Inversely, if you rotate it to the right, the resistance between B and C is reduced, and to the right it increases.
In the meantime, the resistance between A and C stays constant, and is equal to the value of the potentiometer !

So depending on what you want to use the potentiometer for, you can wire it differently. If you want the resistance to increase when the potentiometer is rotated to the right, you can wire the potentiometer between B and C:
potentiometer wiring

Thus, you can replace any resistor of the circuit by a potentiometer!

And trimpots?
Trimpots are just "mini" potentiometers! It works exactly like a potentiometer, with 3 lugs, but you have to set it with a screwdriver. It is quite useful to set the value of a resistor (bias resistors for instance), without having to solder / dessolder all the time.


Logarithmic, linear? Mono, stereo?

The potentiometer is characterized by its value (1k, 100k, 2M...etc.), but not only!

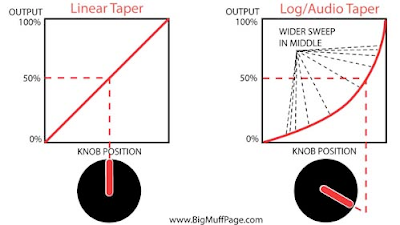
The variation of the resistance can be linear or logarithmic (also called "audio"). When a potentiometer is linear, the resistance will vary in a linear way when you turn the potentiometer (thanks captain obvious), whereas a logarithmic potentiometer will vary in a logarithmic way. That means that the resistor will not change a lot at the beginning of the rotation, and the will vary a lot during the middle / end of the rotation.

potentiometer log vs linear

So.... Why should I use a logarithmic potentiometer?

Two main reasons for that:
  1. The human ear functions in a logarithmic way: the volume is perceived in a logarithmic scale! The volume scale (decibel) is in fact a logarithmic scale. It is quite an important detail: from 95 to 96 Db, you have increase the volume a lot! So for a volume knob, a logarithmic can be better, the volume increase will be perceive as linear by our ears!
  2. With a log pot, the parameter will vary a lot in the higher value, which gives you more precision to set the lower values. This can be useful if you want to set precisely the lower settings, for instance with an overdrive: the low drive setting can be set more precisely, which is better if you want to have a low crunch for instance. Using an inverted log potentiometer allows you to set more precisely higher values of the pot.
I would suggest to try it on some circuits, sometimes it really is better!
Potentiometers are named differently depending on this characteristic:
  • "A" = audio = logarithmic
  • "B" = linear
  • "C" = inverted logarithmic 
For example, a linear 100k pot will be marked "B100K":
potentiometer B100k
A logarithmic 100k potentiometer will be marked "A100k"...Etc.

A potentiometer can also be mono or stereo. A mono potentiometer is a standard potentiometer with 3 lugs. When it is stereo, there is 2 resistive tracks inside the potentiometer: it is a "doubled" potentiometer. Thus, this kind of pot have 6 pins:
stereo potentiometer

It is like having two potentiometers in one! They are rarely used in guitar effects, that are mono most of the time, except in specific cases (in the Klon Centaur for instance, a stereo potentiometer sets the mix between the untreated signal and the drive signal). Sometimes it can be useful if you want one potentiometer that sets 2 different parameters in the same time.

Lets see how useful potentiometers are in a guitar pedal!


Typical uses of a potentiometer in guitar pedals


1. Setting the output volume
Most of the time, the output volume of an effect (especially with overdrives) is louder than the initial signal, especially with a boost, or an overdrive with a second gain stage that allows this volume jump.

To set the volume correctly, we can use a potentiometer, wired as a variable resistor. A part of the signal will go to the ground, whereas the rest of it will go outside the circuit. The potentiometer will split the signal in two:
potentiometer volume
The "official" schematic is on the left, on the right I represented the potentiometer as 2 resistors to make it clearer. When you turn the pot to the right, Rab diminishes, and Rbc increase: less signal go to the ground: volume increases!

Note that signal goes in through the "C" (3) lug, so Rbc increases when you turn it to the right, to make it a volume boost and not a volume cut.

This system is used in almost every guitar effect with a "master volume" knob: Fuzz Face, Big Muff, Tube screamer....

2. Gain setting
The gain of an OP amp is usually defined by two resistors (read my post about resistors in effect pedals):
inverting non inverting OP amp 
The gain of the OP amp is defined by R2/R1 (inverting OP amp) or 1 + R4/R3 (non inverting). So if you replace one of the resistors by a potentiometer, you can vary the gain of the OP amp! 
If you add diodes in the loop, the signal will be clipped, making it saturates. The more gain, the more clipping = more saturation! So a pot in the loop can adjust the gain of the pedal

This exactly what we can find in most overdrive circuits using OP amps! Here is an example from the gain stage of the Jan Ray pedal:
first gain stage Jan Ray gain schematic
The 4 diodes will clip the signal and create saturation. A 47pF capacitor will roll off some high frequencies. The gain resistor of the inverting OP amp (R2) is replaced by R4 + a potentiometer.

If you turn the potentiometer, the resistance of R4 + pot increases, and thus it increases the  gain of the OP amp, leading to more saturation!

The same schematic can be find in a Tube Screamer!


3. Replace a resistor in filters to set amount of bass / trebles
High or low pass passive filters allows to filter bass or trebles. A high pass filter let frequencies that are higher than a cutoff frequency pass, whereas the low pass filter let only pass frequencies that are lower than the cutoff frequency:
Low Pass High Pass filter 
High pass filter let trebles pass, and low pass let bass pass. The sound is not cut directly, but diminish rather fastly from the cuttoff frequency. We can calaculate the cutoff frequency with the following formula:
passive filter cutoff frequency formula
So if you make R vary, you will make the cutoff frequency vary, and you will let more or less bass go through the circuit!

Most "Tone" potentiometers (also on your guitar!) use a low pass filter, whith a potentiometer plus a resistor to set the cutoff frequency. Here is an example from the ProCo RAT:
RAT filter schematic
There it is!

So here are some uses with potentiometers... Experiment and try to replace resistors in your circuit to see whether it is interesting or not!

I hope that you enjoyed this post! Do not hesitate to thank me by liking the Coda Effects facebook page!


Jan Ray in a 1590B with Coda Effects PCB!

Here my latest version of the Jan Ray! This time, instead of the 1590BB or the 125B version, I made a smaller 1590B version, using a PCB that I designed! 

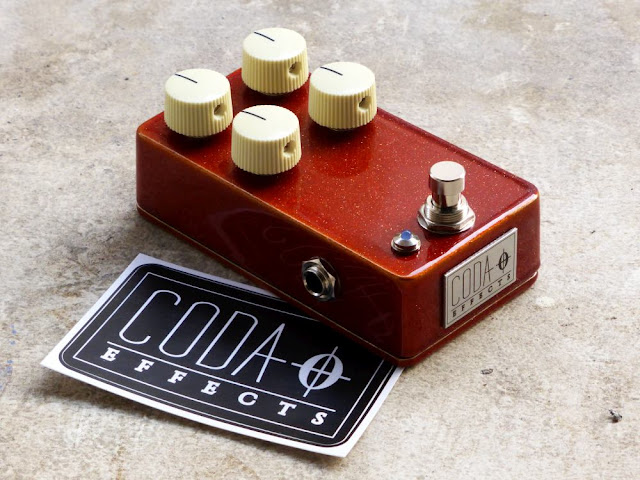
The Jan ray is quite annoying to make on vero, mainly because of the four knobs to wire. A PCB is thus quite helpful to make it easily. Moreover, it allows me to fit it in a 1590B enclosure. Here is the finished pedal:
Vemuram Jan Ray clone

I used the same look as before, with vintage orange sparkle prepainted enclosure, except that it is a 1590B now :)

 Make one yourself

It is quite a simple and fun build to do

Vemuram Jan Ray clone 
I also used a sticker to name it: Golden Hour (vintage overdrive). Photographers will understand! I think it gives a really nice look to this pedal. 

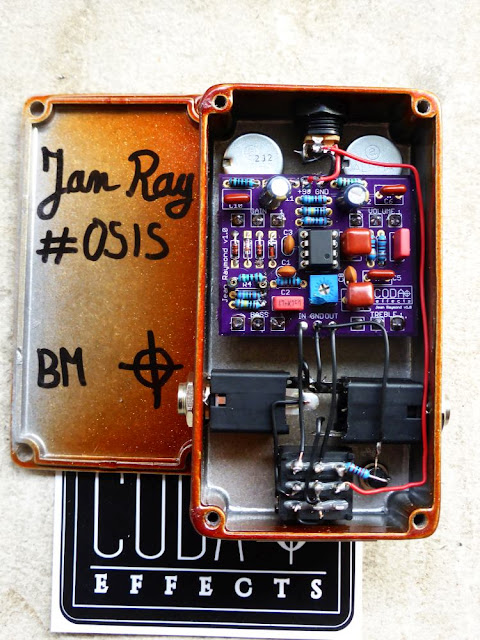
Here is the gutshot:
Vemuram Jan Ray clone
It is the classical circuit of the Jan Ray, with the OP amp, and trimpo for bass content / overall gain. I just changed a few things: R4 is 1.8k instead of 3.3k. This mod allows you to have low gain settings, nice if you want to use this pedal as a clean boost, or just to modify your sounds. Playing with the pedal, I realized you can "stratify" your sound easily by adding trebles and removing bass. Sounded very good with my P90 guitar.

Another modification I did was to replace the OP amp (LM1458) with a Burr brown OPA2134. I think it "soften" a bit the saturation. A nice touch to it.

I am currently testing other mods, with the diodes (LED, compressed...etc.), treble filter (to have less trebles maybe), gain of the last OP amp (too much volume for me on this pedal)

I just made a circuit guide of it to help you understand what does what. The Big muff page has this kind of circuit guide, and I find it very helpful. I hope that you like it, let me know what you think!
Jan Ray Timmy schematic circuit guide
If you want to experiment, socket the component you are interested in modulating, and try different values! Read the circuit analysis I made for more infos.

Sound samples !