

The 3PDT Footswitch
Before going any further, you have to understand how functions a 3PDT footswitch. The 3PDT stands for "3 poles, double throw". Here is a diagram showing the different possibilities :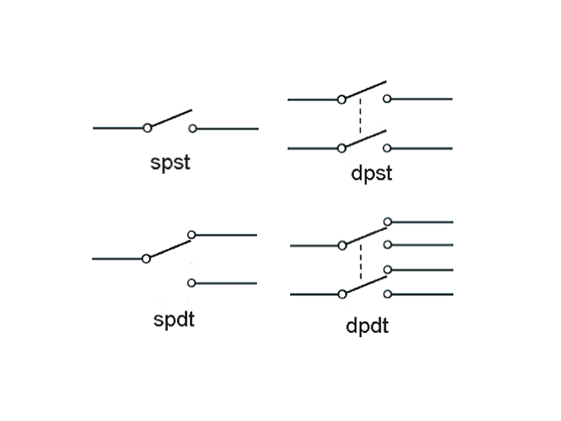
When you use a double pole, simple throw (DPST), it is the same thing, but you connect two things at the same time! It is rarely used but can be useful for specific circuits.
A simple pole dual throw (SPDT) is equivalent to a toggle switch. So basically, double throw just means that you have two positions for the switch. You can send the signal to one side of the circuit or the other side. It is widely used in guitar pedals! For example you can choose between to type of diodes with this kind of switch: on one side it will be a germanium diode and on the other side a silicium diode.
A dual pole DPDT is equivalent to 2 SPDT. It is also widely used!
From that we can easily conclude that a 3PDT is equivalent to 3 double throws at the same time. You have two position for 3 switches with 2 positions each:
How to use it for true bypass?
When you want to do a true bypass, you want a simple thing:- in one position (position 1), input and output jacks are directly connected, the signal does not goes through the circuit (bypass)
- Position 2: input jack goes to the input of the circuit, the output of the circuit is connected to the output jack, and a beautiful shiny LED is on.


If you do not want to bother to solder directly on the 3PDT (you have to be precise and it is not very practical if you want to modify it afterwards, and most of the times it does not look so good), you can directly use a small PCB to make your true bypass like a boss. You can either make it yourself (model here and here), or buy it (very cheap here).
There it is!
I hope this article was useful to you! If you liked it, thank me by liking the Coda Effects Facebook page or follow Coda Effects on Instagram.
Any questions? Suggestions? Post a comment!
5 Comment
Once again, another helpful guide! Thanks a lot.
AnswerYou have a wonderful way of explaining things.
AnswerReally helpful! I've blindly followed plans for true bypass switches before but this really helps make sense of the layout. Thanks
AnswerExactly what I was looking for! Thanks for posting this; had been a stumbling block for me. Graci!
AnswerThank you. This is beautiful.
Answer