Showing posts with label Builds. Show all posts

Another Jan Ray clone !

Here is a pedal I made, a Vemuram Jan Ray clone!

This time, contrary to my previous Jan Ray clone, I decided to make it in a smaller 125B enclosure. It is not particulary a big deal with this pedal, you just have to be precise, and use a guide. I generally use a plastic card or a piece of cardboard with 4 holes disposed as the holes for the potentiometers on the enclosure, and put the potentiometers inside. Then, I cut and solder an excessive length of wire to the veroboard. I use a wire that you can bend so it can maintain the veroboard. Then, I place the veroboard above the potentiometers, and start to cut the wires at the minimal length, and solder it to the pots.

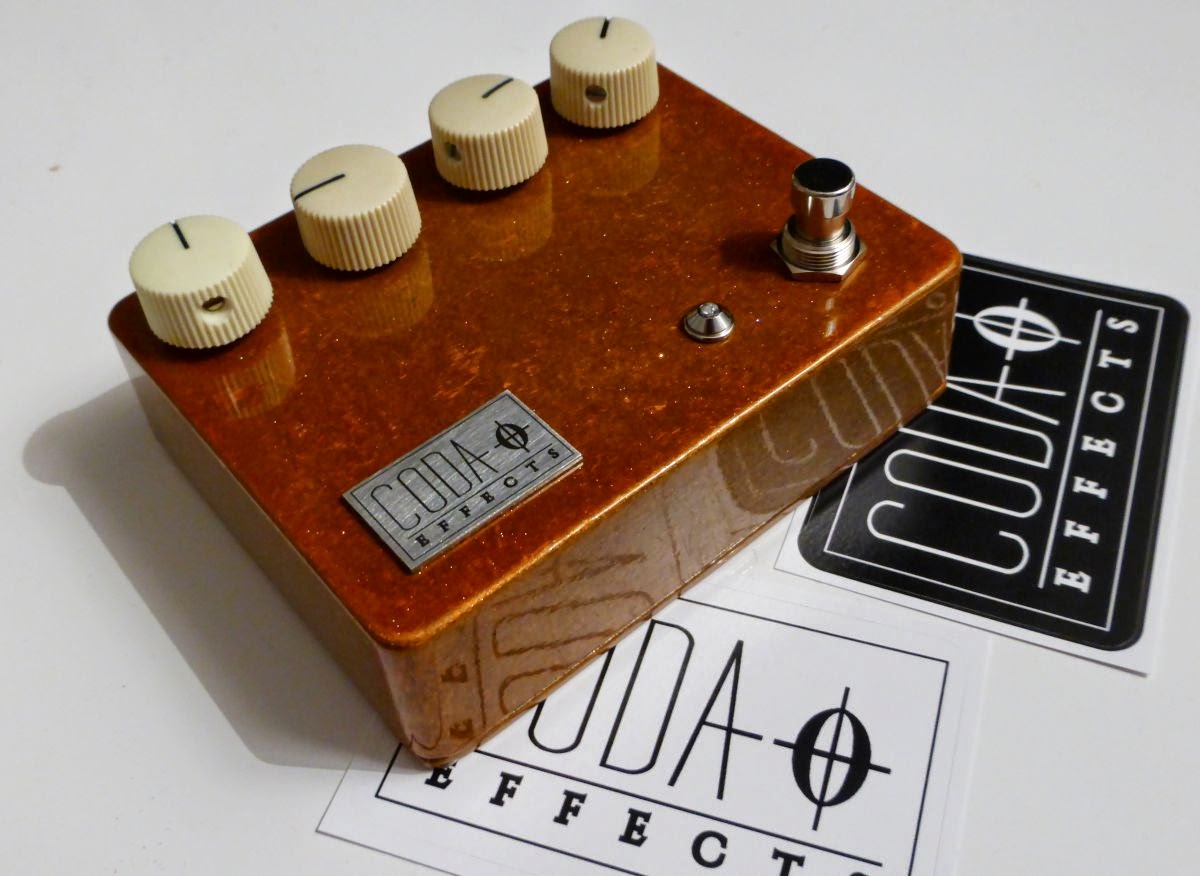
I used a prepainted enclosure from Banzai music (Vintage Orange sparkle), and classic small MXR style 17mm knobs. I also added a switch similar to the one on the Timmy that allows you to choose between a compressed (2 diodes) and an uncompressed (4 diodes) setting.
Vemuram Jan Ray clone DIY
 As usual, I use the laser engraved logo:
Vemuram Jan Ray clone DIY
I had many problem with the enclosure this time, Banzai music apparently have trouble with suppliers, and after 2 months I did not have the enclosure... I finally contact them and change the color of the enclosure. They were really helpful.

If you want more informations about the Jan Ray circuit, read my article here.

JHS Superbolt clone / ROG Supreaux

This is a JHS Superbolt clone! JHS is not one of the most honest builders on the planet, and he is known for his ability to steal circuit designs from other builders. The Superbolt is no exception, and is in fact a really slightly modded Run Off Groove Supreaux. Runoffgroove is a community creating circuits for DIY people, and making it public through Creative Common license. There are many nice circuits there, take a look! JHS did not bother with the license and just copy it and started to sell it.

The circuit is inspired by an old class A amplifier, the Supro 16T. It is a small 5W amplifier from the late 60s. It became quite famous, because like many other class A amplifier, if you push the volume really loud, the amp begins to distort in a really nice way. It was used in studio by many guitarists, especially by Jimmy Page who recorded several Led Zeppelin songs with it.

JHS Superbolt clone

I decided to make a clone, mainly because some videos on the web of the Superbolt were really good sounding. I used a prepainted grey enclosure from Banzai Music, and the "Supro logo" was laser cut by HPM Laser

The pedal has 3 knobs: gain, which acts like the volume of a class A amp: the higher it is, the higher the volume and the saturation. The volume knob acts as a master volume; the tone knob add or remove bass and treble (slightly). There is a two positions switch that allow you to switch between a gainy bassy position, and a slightly less gainy with more treble position.

JHS Superbolt clone
I also used the laser printed logo I used before:
JHS Superbolt clone
The build is quite simple. However, I went through many problems doing it. At first the pedal was not working at all, then only a huge buzz came out of this box... I checked everything several times and was quite despaired about it. So I let it aside on my bench for a few weeks... And finally decided to make it work! The audio probe was really a life-saver on this build.

It is a bit messy inside, but not that much for a veroboard with 3 pots layout. At first I was planning to have space for a battery, but the input jacks were too big for that... So 9V power supply only! Adjusting the 3 trimpots was quite easy. I started with 9V on the emitter of each transistor, but this was too gainy in my opinion, so I diminished it (except for the last transistor). The pedal is thus less gainy.
JHS Superbolt clone


Circuit analysis

Here is the schematic of the ROG Supreaux:
Supreaux

And here is the JHS Superbolt schematic:
JHS Superbolt schematic
You can see that it is basically the same circuit, with an added voltage doubler (top part of the circuit), and a switch adding a 120k resistor connected to the ground before Q3.

Lets divide it in several sections as usual:
JHS Superbolt schematic

You can see that it looks a lot like an amplifier! It is really inspired by an amplifier schematic, except that tubes are replaced with JFET transistors. Which is really appropriate because JFET transistors (Junction Field Effect Transistors) use a technology that is really close to tubes, and they sound quite "tube-like" when saturating: warm, creamy overdrive compared to the aggressive gritty saturation of silicon transistors.
All the saturation of this circuit is based on the saturation of these transistors: you can see that there are no diodes in the circuit. It is different from what we are used to with the Big Muff or the Jan Ray (Timmy).

To sum up, it works like this: the first preamp section amplifies the signal, and will drive the second transistor. The saturated signal will be slightly modified in tone by the tone stack section, and a third transistor will set up the final volume. Like I said, it really works like an amplifier!

Let's see every part of the circuit in detail.

Power supply section
voltage doubler schematic
First, there is a protection against polarity inversion with a 1N4001 diode, and voltage is stabilized with two capacitors. More information about voltage stabilization and polarity protection here.
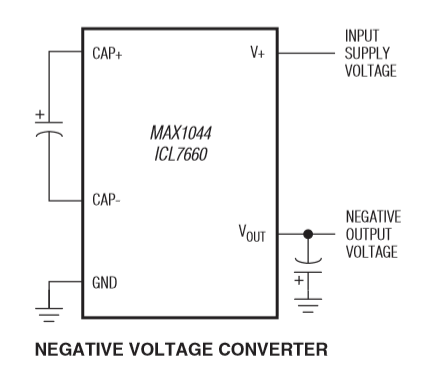
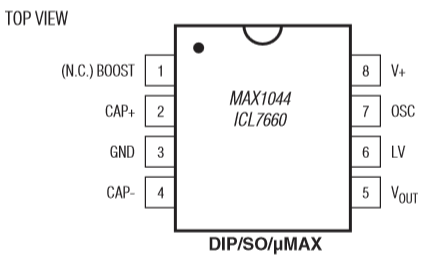
A MAX1044 IC is then used to double the voltage, in order to have an 18 volts bus that will be provided to the JFET transistors. Having 18 volts instead of 9 gives a bit more headroom and clarity to the circuit, and this had been used in the Supreaux Deux version of the circuit. It uses the example circuit that you can find in the datasheet:
Voltage doubler MAX1044
It is a very classical layout that you will find in most pedals using a voltage doubler (Klon centaur for instance).


Preamp section 1: gain
input section JHS superbolt schematic
First, there are two 1M pulldown resistors. Pulldown resistors prevent loud popping noises when you turn the effect on. There is a 22nF coupling cap that prevents any parasitic DC current from your guitar to go through the circuit.

The signal is amplified by the first transistor (Q1). You can see that the overall gain of the transistor can be adjusted with a 100k trimpot that will adjust the DC current on the drain of the transistor. That way, you can set what the maximum gain of the pedal will be. The maximum possible gain is set also by the resistor R3 (1k5).

Then, the signal is filtered a bit by different means: a 470 pF capacitor connected to ground let high frequencies going to ground, thus eliminating a bit of high frequencies. To eliminate more high frequencies, value of this capacitor can be changed to a bigger value like 560 pF for instance. A 470K resistor connected to ground will set the bass response of the unit, and will eliminate a bit of bass. A potentiometer wired as a variable resistor will then set how much signal will go to ground. Thus, it defines how much the signal is amplified, and how much signal will drive the second transistor: it is the gain potentiometer!


Preamp section 2: tonestack
gain section JHS superbolt schematic

The amplified signal of the first section will then make the second transistor (Q2) saturate. The amplification of Q2 is also set by a 100k trimpot and R5 (2k7 resistor), and can be modulate to have more or less saturation.

There is a 10 nF coupling cap to eliminate parasitic DC current remaining from the 18V bus, and then the signal is modified by the tone potentiometer. It is wired as a variable resistor connected to ground, and will eliminate more or less bass frequencies. An optional switch also allows you to connect a 120k resistor to ground, which will diminish overall gain (a part of the signal will go to ground), and bass response (more bass will go to ground than high frequencies with a 120k resistor). This allows you to simulate the two High and Low inputs of the Supro amplifiers.

Again, a 470K set the maximum gain of this part of the circuit.


Amplifier: master volume section
master volume section JHS superbolt schematic
This part of the circuit simply amplifies the final signal. The amplification is set by the 220R resistor and a trimpot (again). Residual DC current is then filtered by a 10nF capacitor.
Final volume is set by a potentiometer wired as a variable resistor connected to ground, like we have already seen in many many circuit, like the Fuzz Face for instance. The higher the value of this resistor will be, the less signal will go to ground and the bigger the output signal will be: more volume!

Here it is!
I hope that everything is clear, do not hesitate to ask question if some stuff is still unclear by posting a comment!
Did you like this article? Like the Coda Effects Facebook page!

To go further:
Runoffgroove Supreaux webpage
Runoffgroove Supreaux Deux webpage
MAX1044 datasheet.

Rub-a-Dub Reverb (1776 Effects)

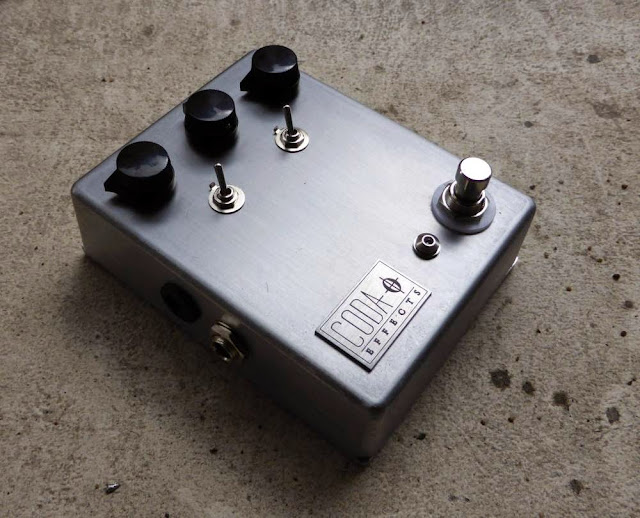
Here is my latest build, a Rub A Dub reverb! It is a really simple yet useful "always on" reverb that can go from a minimal amount of reverb to long ambient delay washes, I love it! One knob, simplicity at its finest.

Rub a Dub reverb tweed pedal
Inspired by Fender amps, I decided to cover an old messed enclosure (bad painting job) with tweed. Oldamp from guitariste.com was nice enough to give me a bit of tweed he had left from the amps he makes.

To apply the tweed, I used a pattern. Corners are especially difficult, because you need to bend the tweed (that is a rather stiff material finally) in a proper way. It was rather a long process because the glue takes quite sometimes to be perfectly dry.

The bottom plate was covered as well. I had to use longer screws in order to be able to close the enclosure! I used a plate that I found on the banzai music website, I thought it was really appropriated for the vintage fender style. There was 3 letters possible: "T", "B" or "V". "V" was the best for me, like "Verb".

Rub a Dub Reverb tweed

It was quite a tight build finally. The enclosure I used was already drilled so I - stupidly - used the same layout. Unfortunately, positioning the power supply at the top of the pedal was not a good idea, I could not directly solder the pot to the PCB. I managed to fit everything. I used gold plated jack input, so gold plated connector could - maybe - finally be useful. I am quite happy with it, because in the end, there is even enough space for a 9V battery!
Rub a Dub Reverb tweed inside

I got the PCB from 1776 effects, a builder based in the USA (1776 is the year of the independence of the USA). He sells a lot of different PCBs for different projects, from overdrives to delays (the multiplex echo machine for instance). This one is a simple, yet good sounding one knob reverb. There is also a "Deluxe" version of it with more tweakability, but for now I wanted a simple build! 

Rub a Dub reverb PCB

The PCB is really of good quality, double sided and have a nice layout. Components are spaced enough so it is not too hard to assemble, but it is compact enough to be relatively small and fit a 1590B enclosure.

Populating the board was really fun and easy, I begin to like these circuits with not too many components! For this Rub A Dub reverb, I used a Long Belton brick, Panasonic FC and SMF (except one that is a MKT standard because the value did not exist in SMF... )

How does it sound?

The "mix" potentiometer is really making a mix between the dry signal and the treated signal. So, the reverb is more or less present. It is really a nice feature, you can vary from a slight reverb in the background or a huge swampy reverb signal. I really like it at high settings. 
My only concern was that I used a Long brick, and as it is not possible to set the decay, the reverb is always very long, even when the mix potentiometer is low. If I remake one, I will use a medium or short brick. Or I will go for the "deluxe" version of the rub a dub reverb that has a potentiometer for decay using the 3rd new version of the belton brick.

I will compare with my Chasm reverb when it will be finished!


Circuit analysis

A stompbox reverb is most of the time a digital effect, simply because an analogue reverb requires a spring or plate system that is way too big for a standard 125B enclosure format. Fortunately for us, a manufacturer called Belton provides Digital Reverb modules that can be used for such projects. They are declined in 3 types corresponding to the possible duration of the reverb: short, medium and long.

Belton brick BTDR2

This brick contains a rather complicated circuit with 3 PT2399 (numeric delay chip) that follow each other with really short delay time to act as a reverb.
Belton brick schematic
Bam! I told you it was kinda complex...

They managed to make it smaller as possible with surface mounted components so we, small DIYers can use it at home to make our reverbs!
It has 6 pins:
  • Pin 1 should receive  a regulated +5V voltage
  • Pin 2 should be connected to power ground
  • Pin 3 is the input of the circuit
  • Pin 4 is the signal ground
  • Pin 5 is the output 1
  • Pin 6 is the output 2 (for stereo applications)
So it is like having another circuit in your circuit (circuitception!)
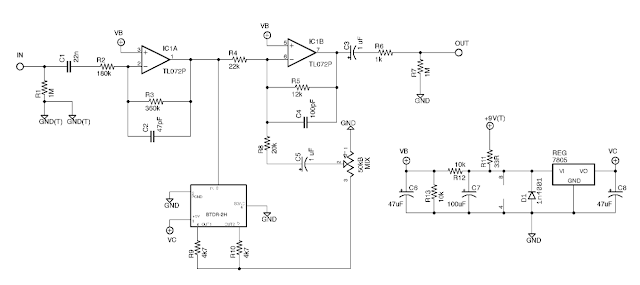
The Rub a Dub reverb is a circuit surrounding this belton brick in order to get the most of it with a simple layout. Here is the schematic:

Rub A Dub Reverb schematic 
Let's divide it in three sections:
Rub A Dub Reverb schematic
The input buffer is a simple OP amp boosting the signal before it is split between dry (analogue signal) and wet (numeric conversion and treatment by the Belton brick). First, there is a 1M pulldown resistor that prevents "pop" noises when a charge accumulates at the entry of the circuit. The excess of current is going to the ground when the effect is activated. Then, there is a coupling capacitor (22nF), preventing any parasitic direct current to go in the circuit. The signal then goes through a resistor and the first OP-amp of the TL072. The TL072 is an IC containing 2 OP amps, which is a low noise JFET amplifier.  It is wired as an inverting amplifier. Thus, we can calculate the gain of it, which is simply R3/R2 = 360/180 = 2. The OP amp multiply the signal by 2, so when it is split between the dry and wet section, it is like having 2 signals like the original one going on each side of the circuit.

The treated signal section (wet section) simply is the Belton brick circuit. The signal enters through pin 3 and goes out through pin 5 and 6. It is then mixed with two 4,7k resistors accordingly to Belton mono circuit example. The signal that goes out the brick is the reverb signal ("wet" signal).  The signal then goes back to the amplification loop of the second OP amp. First, the "mix" potentiometer sets how much wet signal is going back in the circuit to be mixed with the dry signal. So you define how much signal there will be in the final sound! A coupling capacitor prevents any parasitic DC current to go in the circuit, and a 20k resistors defines how much signal can go through at the minimum mix level. A fun mod to do is to put a switch before the 22k resistor in order to make the entire signal going through the wet section: all the signal will be treated, and you will not have a dry signal anymore, creating a "wet" reverb.

The mixing section mixes the dry signal with the wet signal using the second OP amp of the TL072. The amplification gain is around 0,5, so that the mixed signal will be of the same amplitude that the original input signal. Thus, the volume will stay constant. By modulating the resistors values, for instance the 12k resistor, volume can be increased or decreased. It is also possible to put a potentiometer there in order to have a volume / boost knob. Then the signal goes through a 1uF coupling capacitor, and there is another pulldown resistor to prevent noises, and it finally gets out!

The power supply section stabilizes the current and offers a 4,5V voltage, and a regulated +5V voltage. This is important to supply the voltage needed by the TL072 and the Belton Brick. The current enters via +9V(T), goes through a 33R resistor. A 1n4001 diode protects the circuit against polarity inversion, and a 100 uF capacitor eliminates all the residual oscillations that may come from the power supply. More details about the stabilization of the power supply in my dedicated article. On the left side of the power supply section, there are 2 resistors that act as a voltage divider. Half of the current goes through the 10k resistor linked to the ground, and half of it goes to VB. We have a 4,5V VB voltage, perfect for the TL072! On the right of the circuit, there is a 7805 REG regulator. Even if it looks like a transistor (with 3 pins), it is an integrated circuit with a simple role: a voltage between 7 and 36V can enter through pin1, and a stable 5V voltage goes through pin3. Pin2 is connected to ground. It is really convenient when you need a stable particular voltage. There are many possible versions for voltage regulators, depending on which voltage you need:
  • 78xx: positive voltage
  • 79xx: negative voltage
  • "xx": voltage value of the regulated voltage output.
There it is! I hope that everything is clear for you!
Any questions? Post a comment!


To go further:
Belton brick BTDR2H official webpage and datasheet.
Rub a Dub reverb bill of material and informations
About 7805 voltage regulator: more infos here.


    Big Muff Ram's Head clone (73 version)

    Here is the Big muff Ram's Head clone I have made recently. The Ram's Head is one of the most iconic Big muff models. Produced in 1973, it was the second issued version of the Big Muff, just after the Triangle model. Multiple versions of the Ram's Head existed until 1977, including the "violet era" Ram's Head that sells around 1000 dollars on ebay! The Ram's Head v2 is well known as it was used by Pink Floyd's guitarist, David Gilmour. He used the Big Muff combined with a boost in order to have a nearly infinite sustain during some solos, like the famous Comfortably Numb's one.
    EHX 73 Ram's Head clone
    I decided to make this version, with a PCB from musikding. I am currently prototyping a double sided PCB to use it in 1590B enclosures. Here, the PCB is single layer, so I had to use a 1590BB enclosure. I polished the enclosure with sandpaper 140, then 400 and 800 to have a thin polish, following the same direction to make it look like brushed aluminium. I washed it with acetone, and add 2 layers of satin varnish to avoid corrosion.
    EHX 73 ram's head clone
    I followed the classic scheme of a 73' Ram's Head Big Muff (Gilmour!). I used Wima MKP2 capacitors and one electrolytic to stabilize the power supply. I added two switches to control the amount of mids (switch 1) and bass/trebles (switch 2). The first switch allows you to change the 4,7nF capacitor of the tone stack for a 10nF, thus increasing mids. The other switch plays on the resistor and capacitor at the entry of the circuit, giving us 2 options: a very bassy / smooth one which is the classical ram's head, perfect for doom or stoner rock, and another more trebly, gritty and scratchy!
    EHX 73 ram's head clone
    With the PCB, it was quite easy to organize the wires inside the enclosure. With a BB sized enclosure, there is a lot of room!


    How does it sound?

    I did not have time to records samples of this pedal. You will have to believe me then! However, no surprise with this one, it sounds like... a Big Muff! Heavy, oversaturated, compressed, ideal to generate walls of saturation. Ideal for stoner, I played it during almost one hour, playing some Kyuss, Fu Manchu, Queen of the Stone Age whereas I just wanted to test it quickly! The tone potentiometer is really efficient and allows you to go from a bassy heavy sound to something more gritty and aggressive. The bass switch is also really efficient, on one side you have a classic ram's head with a lot of bottom end, quite smooth in the highs, and something more gritty on the trebles on the other side of the switch. The mid switch is also quite efficient, we can hear that sound is more "full" when switched on, and it really works well in a band situation. I am really happy with the result, it is exactly what I was expecting!


    How does it work?

    The Big muff is one the favourite circuit of guitar pedal builders (with the Tubescreamer). Indeed, its circuit is really well known, there is a lot of information available all around the internet, and it is really easy and fun to modify! Each component plays a particular role, and changing it for a different value will change the overall sound of the pedal without damaging the circuit most of the time. It is one of the most cloned guitar pedal, by DIYers or by boutique companies: Mojo Hand FX, Earthquaker Devices, Pete Cornish... Almost every brand has its version of the big muff!
    Big muff boutique pedals
    Attack of the clones: all the pedals in this picture are Big Muffs 
    or "heavily inspired" by the Big Muff pedal

    Technically the Big Muff is not a fuzz but a distortion with most of the saturation coming from diodes. However, it has 2 distortion stages, causing the heavily compressed and saturated sound of the Big Muff. The sound is finally close to a fuzz. Lets have a look on the circuit schematic:
    EHX 73 ram's head circuit schematic

    I know, it seems horrible and over complicated... Too many components! But lets divide it in 5 sections:
    EHX 73 ram's head circuit schematic
    Big muff input section
    The first section (input section) is simply a buffer to adapt the impedance of the guitar to the first distortion stage, and which amplify also the signal. As OP amp did not exist at that time (1973, remember?), this is made with a transistor wired in common emitter. Today, a simple OP-amp would be enough! First, there is an input resistor which will diminish a bit the amplitude of the signal. Then, a coupling capacitor will remove any parasitic DC current that mights come from the guitar. Changing the values of the coupling capacitor and input resistor can changes the amount of bass and trebles of the big muff. That is how I made the switch on the pedal. A bigger value resistor and a higher capacitance for the coupling capacitor will increase the bass response of the unit. Then, a transistor wired in common emitter will amplify the signal. Depending on the amplification of this stage, the saturation will be more or less important. The amplification is set by the different resistors on this circuit. Changing resistor's values can increase or decrease the overall gain of the unit. Next, there is a coupling capacitor (again), and a potentiometer wired as a variable resistor that will allow the user to set the amplification on this stage = gain of the Big muff! 

    Big muff circuit saturation
    The second and third part (first and second clipping second) are in fact exactly the same circuit. It is used to distort the signal, through the clipping induced by diodes. There is first a coupling capacitor (if you look carefully there is one at each section's start except the tonestack), followed by a resistor. Then, there is a transistor wired in common emitter like in the first part of the circuit with resistors to define its gain. A 470pf capacitor will allow more or less trebles to go through the section. Changing the three 470pF capacitors for a larger value (like 560pF) will diminish the trebles of the unit. This is the case in many clones, like in the Iron Bell from Mojo Hand FX for instance. The diodes will clip the signal and generate the saturation. In classical Big Muff, silicon diodes are used, but in some "boutique" clones, germanium diodes clip the signal (pharaoh fuzz for instance). With germanium diodes, there is less volume, and the sound is even more compressed and saturated! For more infos about diode clipping, read my article about the Jan Ray circuit.


    The third part of the circuit is for me the most important part, the tonestack! This little circuit is what gives the characteristic sound of the Big Muff, and the medium loss, the enemy of guitarist playing in a band. Indeed, when you loose mediums, you litteraly disappear from the mix, as if the guitar was muted! A lot of mods do exist to avoid that: a switch which modify the values of the resistor linked to the ground or the 4,7nF capacitor (which I did on this Big Muff), or to use a potentiometer instead of a resistor, and modify the values of the components to have flat mids, to have a proper medium knob (AMZ tone stack). It is also possible to replace the tone stack by another one, like on the Pete Cornish G2. You will loose the Big Muff style distorsion for a much classical overdriven sound. You can even remove it! You will then have an "in your face" sound with a lot of mediums. You can find this system on the Dwarcraft Eau Claire Thunder for instance. Experiment by yourself, the tone stack is a simple circuit and changes a lot the sound of the Big Muff. A lot of fun! 

    Big muff output section
    Finally, in the output / volume section, the signal is amplified again (to prevent volume loss due to the diodes clipping). It uses a transistor wired in common emitter biased to have a strong amplification. A coupling capacitor is present, followed by a potentiometer wired as a variable resistor to modulate the output signal amplitude. We can recognize (again !) the volume control of a fuzz face!

    I really advise you to make a muff once. It is really fun to make and to mod. After reading the Big Muff page, you will know exactly what to change to make it sound like you always wanted!

    To go further:
    Big muff Page: THE website about big muffs! All the versions, schematics and more! A must read for muff lovers.
    Big muff pi circuit analysis (electrosmash): precise analyse of the circuit
    AMZ tone stack: study about the big muff tonestack, alternative tone stacks
    Big muff mods and tweaks: Some easy mods for your big muff. They are easy but funny mods!

    Dead Astronaut FX Chasm Reverb PCB

    Today I received a PCB from Dead Astronaut FX, the Chasm Reverb!
    Dead Astronaut (alias Robert Henry) is an effects builder based in the United Kingdom. He builds a lot of different effects (fuzz, distorsion, tremolo, delays...), with beautiful etched enclosures.

    I recently had a crush on the reverb he makes, the Chasm Reverb. It is a beautiful, deep sounding reverb that can auto-oscillate to create great sounding "waves" of sounds, ideal for post rock or prog rock. It is based on a Belton Brick, an IC allowing builders to make digital reverbs. Moreover, it has interesting options compared to other reverbs: a mix potentiometer to choose the amount of dry and wet signal, and a bypass system that let the reverb ends when you turn the effect off. It is called "trails". There is also a "damp" setting and volume.

    You can find demos on youtube (chasm reverb or prismatic reverb) that are really great sounding!

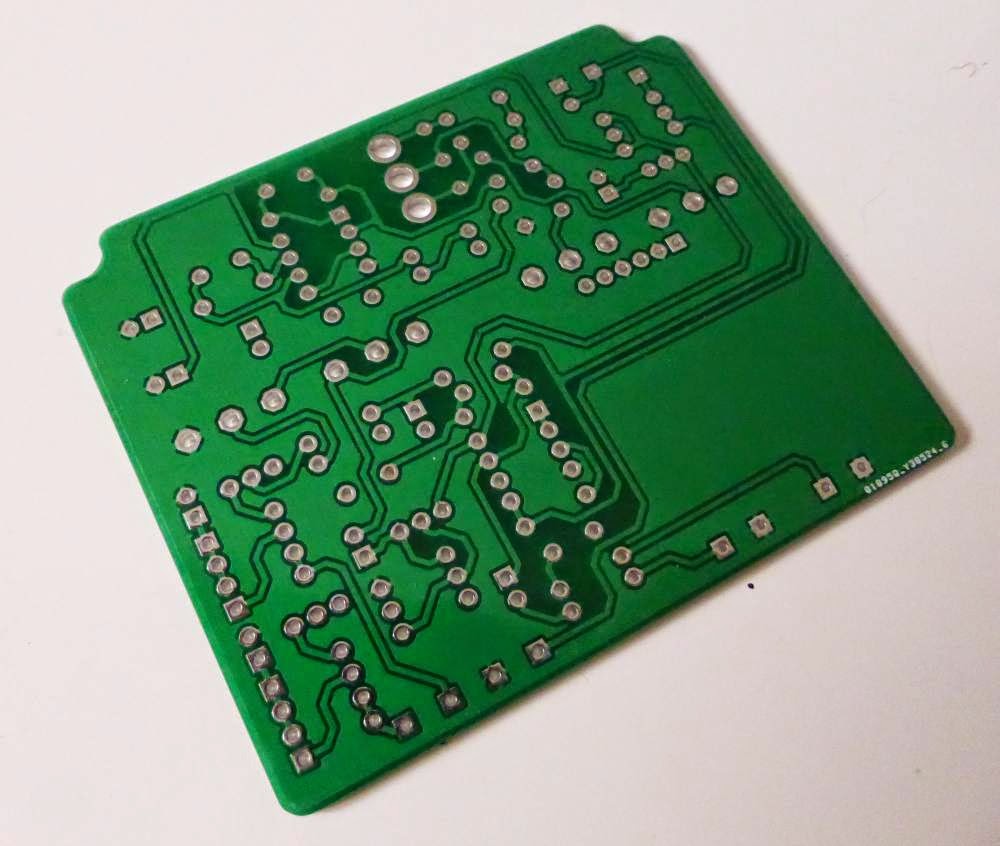
    Dead Astronaut can make the Reverb for you, or you can order a PCB to make it yourself. As being a DIYer, I ordered the PCB for a reasonable price of 11 pounds. If you want to make one, you can buy the PCB here. Robert is very helpful and replies quickly to emails, he gave me a lot of useful informations. The PCB is of very good quality, double sided with a nice ground plane. The Chasm reverb layout is quite nice, and not too compressed:

    Chasm Reverb layout PCB
    We can see the big space necessary for the Belton Brick
    (Digital Reverb IC)

    Chasm Reverb layout 
    The circuit is nice seen from the bottom too!

    I started to populate the board. I could add every resistance, but I miss some diodes types and capacitors values. And of course the Belton Brick!
    Prismatic Reverb PCB populated
    I am really looking forward to hear it!

    Dead Astronaut's website:
    http://deadastronaut.wix.com/index

    Analogman sunface DIY clone #2

    As I was curious, I decided to build another analogman sunface with the NKT275 red dot transistors I got. However, whereas my first Sunface used a veroboard, I decided to use a PCB. The layout I used for this was conceived by Scruffie, and uses a voltage inverter with a MAX1044. A very ingenious system allows you to switch the power off when you unplug the input jack, very useful with 9V battery. However, as the enclosure I used was quite small (1590B from Hammond), I did not have space left for a battery so I decided to go full power supply. Which is also more practical for a pedalboard stompbox that you are not going to move a lot. And with the voltage inverter, any 9V boss like power supply is perfect! I used a 3PDT PCB. It is very practical, and most of all, really really neat looking. I really paid attention to the wiring this time and try to make the cables as short as possible. I am really happy with the result, it is really nice looking inside.
    Analog Man Sunface clone I decided to make a simple yet classy look with an aluminium faceplate and a laser engraved logo. The logo were engraved by HPM laser, very helpful and affordable! On the faceplate, I drilled the holes for three potentiometers and I engraved letters (I painted the letters with black ink after engravement). F = fuzz, V = volume and B = bias of course. I am really happy with the result.

    As I was planning to sell it, I also got some "boutique kit accessories" like a small cotton bag I got on amazon and stickers that I got from Moo. Used this link to have a 10% discount: http://uk.moo.com/fr/share/#8srxpd .
    Analog Man Sunface clone

    Analogman Sunface clone gutshots 

    HOW DOES IT SOUND?
    I made a small video to test my camera. It is not the best sounding demo ever (I do not have the gear necessary to record proper demos...) but it can give a quick idea of how the pedal is sounding. Do not mind the string noise please! I will remake a proper video when I will have a bit more time. For me, this guitar pedal sounds very good, plenty of low end, and very sensitive to the guitar volume knob.


    HOW DOES IT WORK?
    It is the same circuit as the Sunface, with the bias knob. I already wrote a post about the Sun Face circuit, you can find the Fuzz Face circuit analysis here. The PCB follows the same layout.
    However, the power supply section is modified to accept a +9V classic power supply (finally!). For that, it uses a MAX1044 integrated circuit, which can invert the supplied voltage. Here is the schematic that we can find on the datasheet:
    voltage inverter guitar pedalvoltage inverter guitar pedal
    Just a few words about datasheets: they are like ID for components. You can find datasheets on the supplier's website (for instance Wima if you are looking for the Wima MKP2 capacitor's datasheet). All the characteristics of the component are written in the datasheet. Thus, it is really useful to look for the datasheet if you miss something about one component (exact size for PCB, max voltage...)

    The voltage enters the chip through the V+ pin (number 8), and goes out inverted through the number 8 pin. The pin number 3 is connected to the ground, and a 10uF capacitor is connected between the cap+ (connected to the + lug of the cap) and cap- (Guess which side of the cap ^^). A 10uF is connected to the ground near the output voltage.

    The power supply can be also a bit improved with a simple layout that you will find in many stompboxes. It is present in Scruffie's layout (without the 0.1uF capacitor)


    Guitar pedal power supply 
    The diode connected to the ground protects the circuit from polarity inversion. Indeed, the diode only let the current goes through in one direction (following the arrow of the scheme of the diode). So if we plug a classic center negative power supply, the ground will be 0V, and +9V will be +9V. No current will go through the diode. However, if we plug a center positive power supply (which can happen with fuzz faces that usually need center positive power supply), the ground will become +9V, and the voltage will be the ground! In a normal context, this would damage the components, and specially the transistors... However, here, the current will go through the diode straight to the +9V (ground), avoiding such trouble (quite annoying with NKT275 transistors, which worth almost 30 euros!)

    The 100 ohm resistor, combined with the 47uF and 0.1uF capacitors eliminate all the residual oscillations that come from the power supply. Indeed, when the current is converted from alternating to direct, some ripples can still be there. As the capacitors only let the alternating current go through them, the alternate current will go to the ground instead of parasiting the circuit and generating "hum" noises! The different values of the capacitors are here to eliminate high and low frequencies of alternating current.

    In the end, with this simple layout, we get an input voltage more stable (less noise), and a protection if someone plugs in the wrong power supply (center positive instead of negative). Which can happen with Fuzz Faces!

    I hope that everything is clear! If not, post a comment!

    To go further:
    Geofex from +9V to -9V: an ingenious system to use the battery only when a jack is plugged in.

    Vemuram Jan Ray clone

    I recently made a Vemuram Jan Ray clone. For the record, the Jan Ray overdrive is one of the many scandals that shook the boutique pedal community recently. Indeed, the Jan Ray has been proven to be a Paul C. Timmy slightly modified as we will see by studying the circuit. However, Vemuram pretended that it was an original design he made up listening to old Fender amps during 3 years... And sold the pedal at an indecent price for an analog pedal: 370 euros (400 dollars) ! This is a typical marketing strategy: "the price represents the quality", which is totally absurd for a basic electronic guitar pedal... He sold a lot of them whereas Paul C. produced the same pedal for 120 dollars. This a pedal that deserves to be cloned, and if you want to buy this sort of overdrive, go for the Timmy!
    Vemuram Jan Ray DIY 
    I made it on a veroboard, using the scheme from the excellent website Guitar FX Layouts (best website when it comes across veroboard schematics). Not much to tell you about the making, this is quite a straightforward pedal to make, even if the board is quite compact in the end ! 1uF Panasonic SMF capacitors are very space consuming, so maybe it would be better with a slightly bigger board. I started with by drilling the holes and placing the linkers (and checking connections with a multimeter), then the IC socket, resistors, capacitors, pots and jack inputs. I used a PCB for the 3PDT to make it a bit cleaner looking, as there are already a lot of wires going everywhere (4 pots is quite a lot)... My advice in those cases is to wire everything directly in the enclosure. Solder the wires to the PCB with excess length, place the PCB or veroboard in the enclosure and then cut the wire to the appropriate size, and solder them. With high gauge (like 50), you can twist the cable to make a structure to maintain the veroboard in the enclosure. It also allows you to make the cables follow the same route, thus looking cleaner.
    Vemuram Jan Ray DIY

    I used a prepainted enclosure from Banzai music (the European version of Mammoth electronics), in vintage orange sparkle. It is a little bit more expensive than raw aluminium boxes, but it is really cleaner. I used the same knobs as in the Jan Ray (vintage fender, yeah !), and used a laser engraved logo. Simple and classy look I find !
    Vemuram Jan Ray DIY


    How does it sound?

    The conception "work" done to create this pedal can be criticized a lot, but I have to recognize that it sounds very very good. Nice saturation that goes from something light like a klon, goes through blues / rock like AC/DC, to finish with a nice overdrive / distortion. Always very nice sounding, not compressed and mushy, with a possible huuuuuge volume intake. The volume equivalent to the bypass volume is at one quarter of the knob value ! Great for soloing or to play with a volume pedal placed after it. Equalization is reactive and allows you to add or withdraw bass and treble efficiently. It is a very transparent overdrive that respects the guitar and amplifier that you use. I recorded some samples (camera mic, sorry...) with my Les Paul 54 reissue (P90 goddess), my vox lil' night train and a malekko Spring Chicken to have a bit of reverb. In the end of the track, I used my boss DD2 for a 80s saturated type of sound (yeaaahh !)


    How does it work?

    Here is the schematic of the Jan Ray circuit as it is on the veroboard (a bit different from what you can find online, but functional !)
    Jan ray schematic
    Vemuram Jan Ray schematic (Made with Eagle)

    It is quite a classical layout, using the 2 OP-amps included in the LM4558 IC. The first OP-Amp is used to clip the signal to generate saturation, whereas the second one is used as a basic volume boost. Let's divide the circuit in different sections.
    Vemuram Jan Ray schematic

    The first "input" section has different roles. First, there is a 47 uF coupling capacitor to eliminate any DC current that could go in the circuit. There is also a 1M pulldown resistor used to avoid popping noises when the effect is turned on. These noises are due to a small charge that accumulate at the entry of the circuit and cannot go through the first coupling capacitor. When the effect is turned on, this charge goes through the circuit and causes the awfully loud "pops"... To avoid this, a 1M resistor is linked to the mass to absorb the excess of current.

    The signal then enters the gain/dirt section, which role is (obviously) to generate saturation. It enters in the first OP-amp of the LM4558 (it is a double OP amp), which has an inverted feedback loop to amplify the signal. The signal goes in the loop. High frequencies can go through quite easily with de 47 pF capacitor. The remaining signal will change depending on many parameters :
    • the gain potentiometer acts as a variable resistor connected that will reduce more or less the current going through the loop. The amplitude of the voltage going through the diodes will varies, and thus will be more or less clipped.
    • A trim potentiometer combined with the 9.1k and 600 ohms resistors allows you to tweak the maximum possible gain. This is useful to adapt the maximal gain setting depending on the output levels of your pickups.
    Diodes are the main actors in creating saturation. They will more or less crop the signal in the feedback loop. This is a classical "soft clipping" system that you will find in many many guitar pedals, like the famous Tubescreamer from Ibanez. Depending on the nature of the diodes, the signal will be more or less clipped. Silicon diodes usually clip at 0.7V whereas germanium diodes clip at 0.35V approximately. This is why saturation with germanium diodes can be more compressed, and why there is volume loss with germanium diodes : the signal amplitude is smaller.

    diode clipping tubescreamer
    Fig. Diode clipping system in an amplification feedback loop

    Using two diodes following each other like in the Jan ray makes the clipping less important, and thus "uncompresses" the sound. Your playing and pick sensitivity is still audible because the signal is not as clipped as in other saturations like a big muff. A very simple mod to ear that is to use a switch to choose between 2 or 4 diodes in the loop. The Timmy by Paul C has this option for instance. 


    Then, the signal goes through the output/volume section. A potentiometer is wired as a variable resistor to act as a low pass filter to adjust trebles. The signal then goes through the second OP amp that is just used to amplify the signal. The 3.3k resistor determines the gain of the amplifier, which is set quite high.
    Finally, a coupling capacitor filtrates DC current that could have gone through the loop and thus only allows the signal to go through. Then, a potentiometer wired as a variable resistor to the mass allows you to diminish the amplitude of the final signal, constituting a classical volume knob. This almost the same volume control than in the fuzz face !

    Last section of the pedal: stabilization of the power supply and "creation" of the VREF ("power supply section"). The diode at the entry protects the circuit from polarity inversion. Two grounded capacitors are there to get rid of the ripples that might be present in the power supply. Low frequencies are eliminated with the large 47uF capacitor, whereas the 100 nF capacitor is used for high frequencies. In the end, we have a proper +9V voltage that can be used with the OP amp. Another part of the current is used to create the reference voltage (VREF) by going through a 9,1k resistor. 


    Did you like this article? Thank me by liking the Coda Effects facebook page or subscribe to the mailing list!

    Any question? Post a comment!
      

    To go further:
    Pulldown resistors: http://www.muzique.com/news/pulldown-resistors/
    Tube Screamer circuit analysis (circuit is closed to the timmy / Jan Ray) : http://www.electrosmash.com/tube-screamer-analysis#power

    Big Muff Variant (in process)

    I am building a Big Muff variant. As a base, I am using a classic ram's head PCB (made by etronics, cheap and quick, really good manufacturing!), which was quickly populated with BC109 and MPSA18 transistors (cool combination!), metal film resistors and a lot of Wima film capacitor MKP2:
    Big muff PCB rams headBig muff PCB rams head
    Fig. 1 Empty board, and populated PCB ! Very quick and funny to do !

    I have already done few modifications on the circuit: possibility to bypass the tone stack circuit, feedback loop between the transistors for a maximal gain with a momentary footswitch. I changed a lot of values to make it smooth and not too scooped in the mids. It is already a very funny and good sounding device ! Last thing missing would be a 3-bands equalizer alternative (it would be possible to choose between classic big muff tonestack or a 3 band EQ with a switch).
    It is already a "smooth" big muff, not too gritty, and has a lot of bass. The tone control is really efficient, but I still need more mids!

    I am also trying to make a smaller proper PCB for this variant, in order to fit it into a BB enclosure. I am working on this with Eagle, a software to conceive PCB. Hopefully I will manage to finish it soon!

    Strymon Favorite Switch DIY

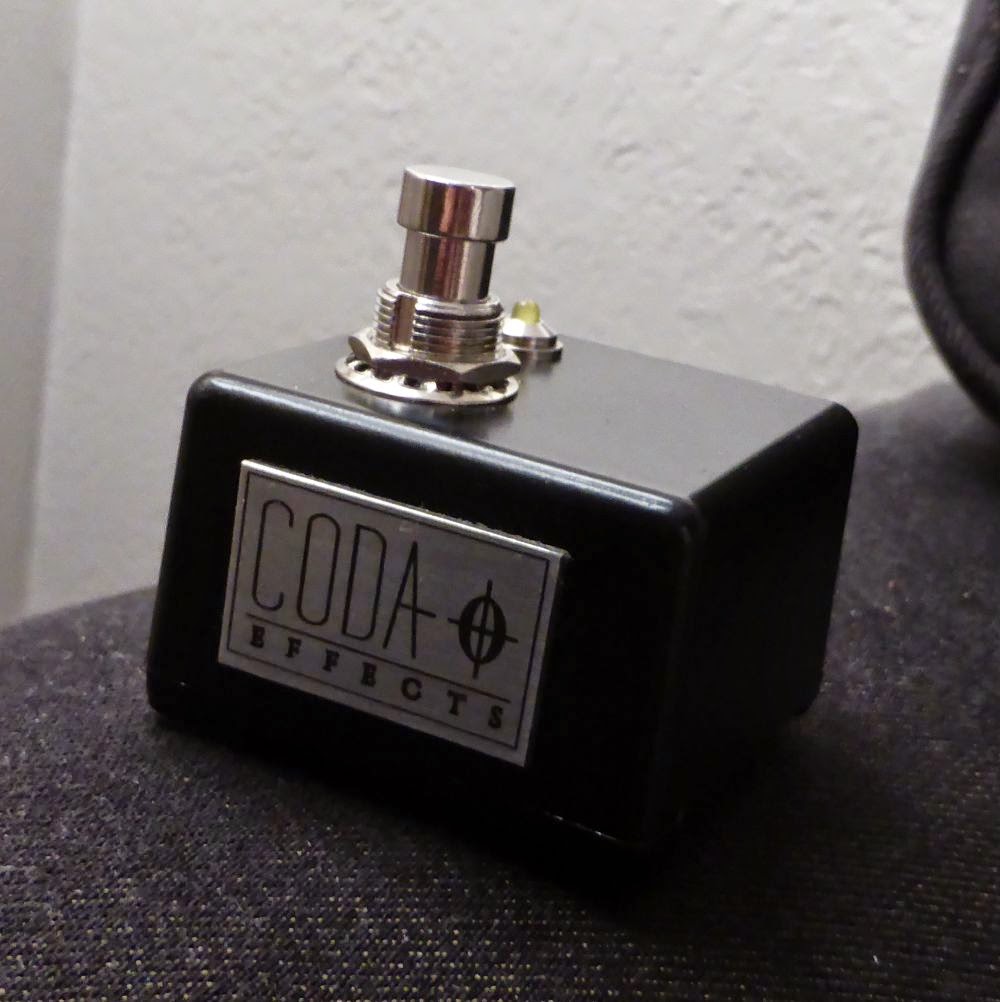
    I love my El Capistan from Strymon. It is a great tape delay, with a lot a features to adjust the sound exactly how you want it. Great ambient sounds, rhythmic delay or something subtler for solos... What was missing was just a way to save settings and have presets like on many delays (TC electronics Flashback, Line6 DL4, Timeline...)

    I looked into Strymon Favorite Switch, but it was a bit expensive for me, and unfortunately impossible to find used... As I read that it was super easy to build, I searched a bit on the Internet, and it REALLY is extremely simple!


    Strymon favorite switch circuit 
    Fig. 1. Most simple and useful scheme in the world

     
    You just need a simple footswitch (Single PDT is enough!), a LED, a 1k resistor (you can use different values depending on how bright you want the LED to be), a stereo jack input and a small enclosure like Hammond 1590 LB. You do not need any battery or DC power jack because the DC current is directly provided by the Strymon pedal with the tip of the stereo jack.


    DIY Favorite switchDIY favorite switch
    Fig. 2. Step 1: drill a hole in the box. Step 2: put your junk in that box.
    Step 3: make her open the box (sorry, had to be done)

    The most annoying part of this build is drilling the box, you have to be a bit precise in order that all the components will properly fit in. Apart from that it is really simple and totally worth it.

    DIY favorite switch


    How does it sound?

    The setting is properly memorized, which is useful when you want to use two types of delay during the same song for instance. You just need a small stereo jack cable (not so easy to find).


    If you liked this article, thank me by liking the facebook page!
    Any questions? Suggestions? Post a comment!